How to Set Up an Email Account on Android and iPhone

Smartphones are an essential part of our lives. They bring the world to our fingertips. We can stay in touch with loved ones, manage tasks, click photos, read news and manage emails on the go.
To fully utilize the power of email on your smartphone, you first need to set up your email account.
Here is a comprehensive guide on how to set up an email account on your phone.
But first…
What You'll Need
Setting up email on your Android phone or iPhone is quite easy if you know what information you need and where to look for it. So, here are the things that you need to find out before getting started:
- Your email address and password, of course.
- Consider what kind of email account you have.
Is it Yahoo? Gmail? Or something else? You must know your username and password if you have an email account. If you don't have an email account then you can easily create a new one with your preferred service provider and remember the username and password.
If your email account is not one of Gmail, AOL, Yahoo, or MobileMe, you will also need to set up an incoming (either POP or IMAP) and outgoing mail servers (SMTP).
What Is IMAP?
IMAP (Internet Message Access Protocol) is a protocol used to receive messages from a server by email clients using a TCP/IP connection. It saves email data on a server so that you can access your email account, regardless of the service provider, from any device such as your mobile phone or computer.
What Is POP?
POP (Post Office Protocol) is another protocol that is intended to receive emails from a remote server and store emails locally, for offline access. This is rarely used these days because of the 24×7 internet availability. Still, POP is relevant in areas where connectivity is slow or unavailable.
What Is SMTP?
SMTP (Simple Mail Transfer Protocol) is an industry-standard protocol for sending emails.
IMAP and SMTP work together to send and receive emails between different email service providers such as Gmail, Outlook, Yahoo and others.
How to Set Up Email on Android
Now when you know about protocols we'll show you how to set up email on different mobile devices.
You can use any one of the several email apps to set up your email account on your Android Smartphone. Here, we will explain how to set up your email account via the pre-installed Gmail app.
While the user interface may vary, the general concepts of steps are the same as those described below.
Adding a New Email Account via Gmail App
Step 1: Tap the Gmail app ![]()
Step 2: Tap the Hamburger icon in the top-left
Step 3: Tap on "Add account."
Step 4: Select your email provider. If not listed, tap "Other."
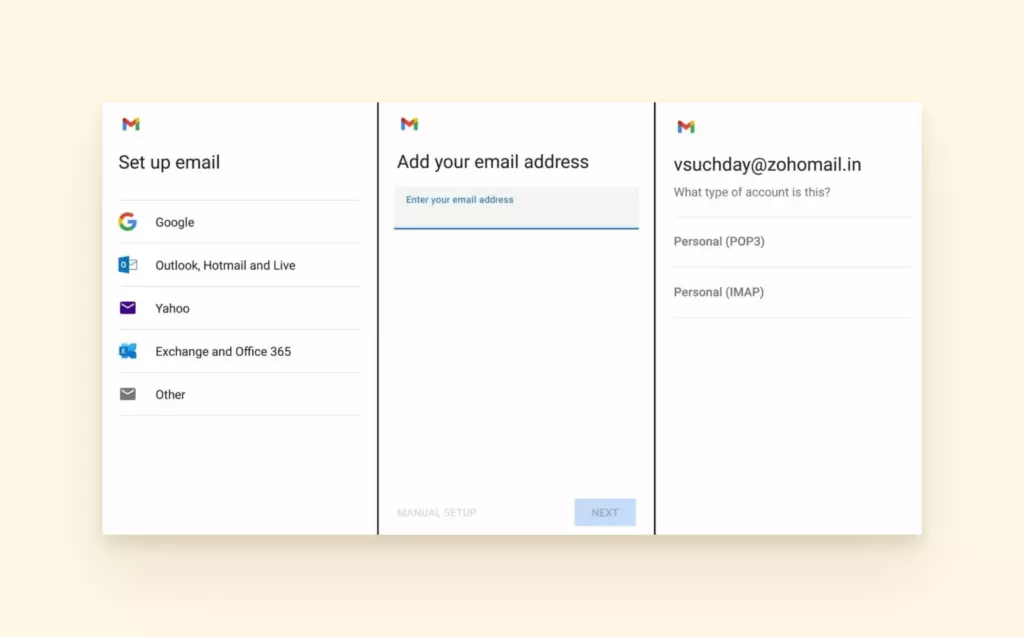
Step 5: Enter your email address and Tap "Next."
Step 6: Choose your email account type.
Step 7: Enter your email password and Tap "Next."
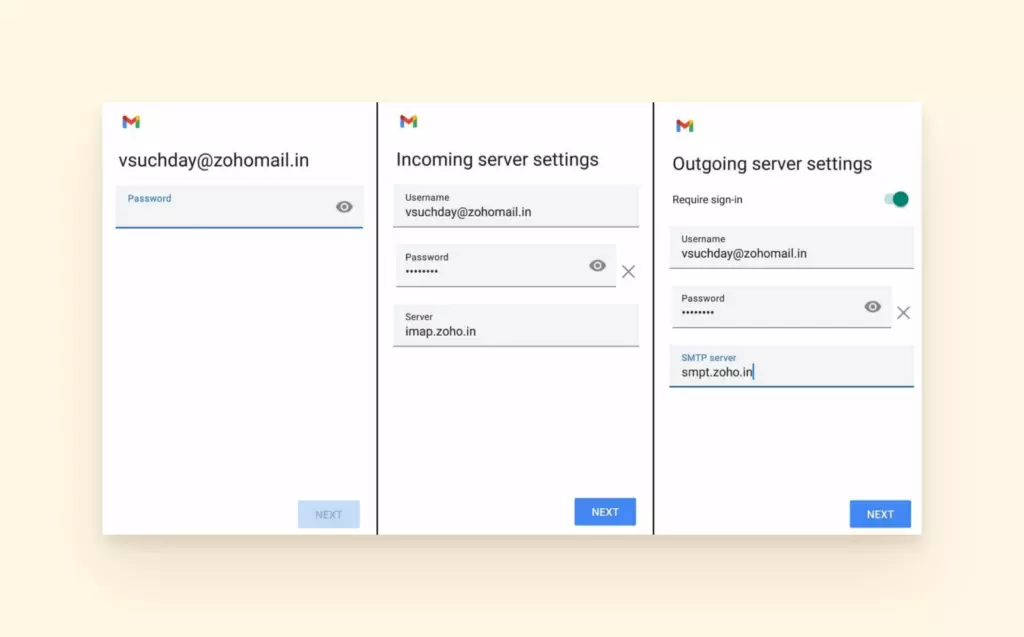
Configuring Incoming Server Settings
Step 1: Enter username, password, and email service provider domain name preceded by "mail" (for instance, mail.yahoo.com).
Step 2: You need to add the "Port Number" and "Security Type."
If you are using POP, then you can choose between:
| POP | Port | Security Type |
|---|---|---|
| Secure | 995 | SSL/TLS (Accept all certificates) |
| Insecure | 110 | None |
If you are using IMAP, then you can choose between:
| IMAP | Port | Security Type |
|---|---|---|
| Secure | 993 | SSL/TLS (Accept all certificates) |
| Insecure | 143 | None |
Step 3: Once you have entered the relevant information, tap "Next".
Configuring Outgoing Server Settings
Step 1: In the "Username" input box, enter your email address. Enter your email password and email service provider domain name preceded by "mail" (for instance, mail.yahoo.com). Tap Next.
Step 2: For the SMTP "Port Number" and "Security Type," you can choose between:
| SMTP | Port | Security Type |
|---|---|---|
| Secure | 465 | SSL/TLS (Accept all certificates) |
| Insecure | 26 | SSL/TLS (Accept all certificates) |
Step 3: Configure "Email Account Options"
- Notify me when a new email arrives: You can leave this checked if you want to receive new email alerts.
- Email Checking Frequency: You can set how frequently you'd like your smartphone to check for the latest emails.
- Synchronize email from this account: Leave this checked if you want to pull old emails from this account.
Once you're done, tap the "Next" button.
Step 4: On the next screen, you have the option to change the default "Account Name" of your email. This can help you differentiate it from other accounts on your device. You can also fill in the "Your Name" field to add your name to outgoing emails.
Step 5: After that, tap on the "Next" button and wait for your email account to be added. Note: If you want to change settings such as the electronic signature on your emails, then head to the "Manage your Google Accounts" option.
How to Setup an Email on iPhone
It is easy to configure and set up your email account on your iOS device.
So, here is how you can set up your email account on iPhone:
Adding a New iCloud Account
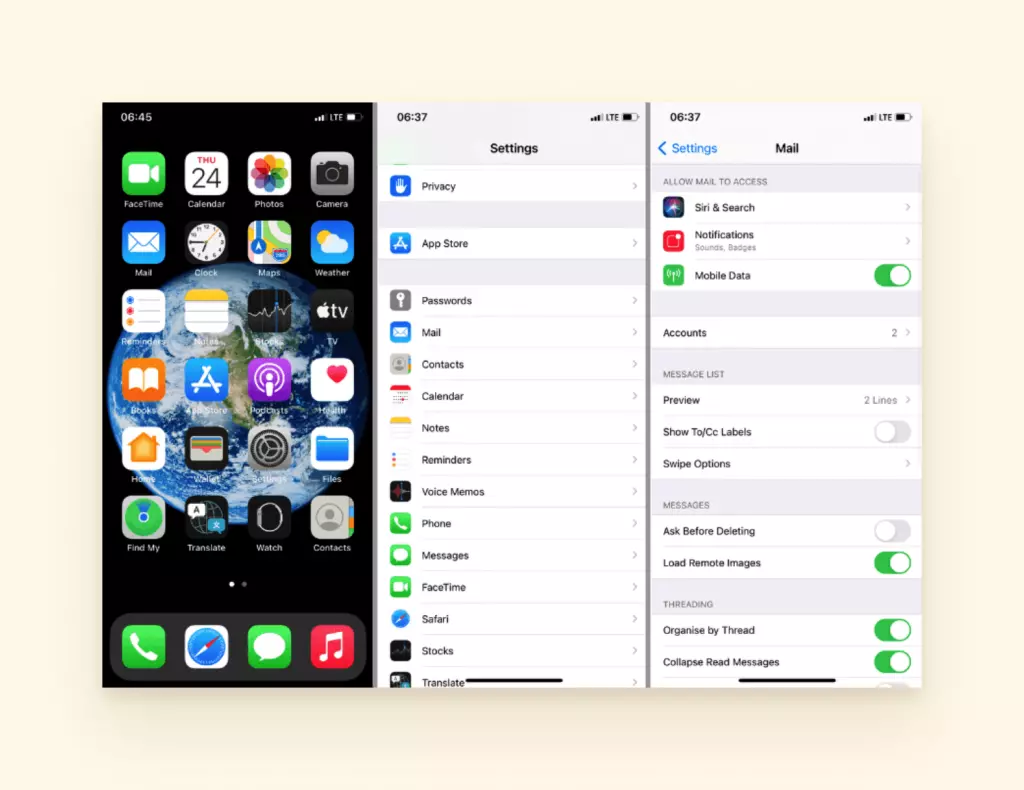
Step 1: On your Home screen, tap "Settings."
Step 2: Navigate to "Mail."Step 3: Tap "Accounts" and then the "Add Account" option.
Step 4: Tap iCloud. Take note that iCloud recognizes the @me.com, @icloud.com, and @mac.come email address domains.
Step 5: Enter the email address and the password associated with your Apple ID. Tap the "Next" button.
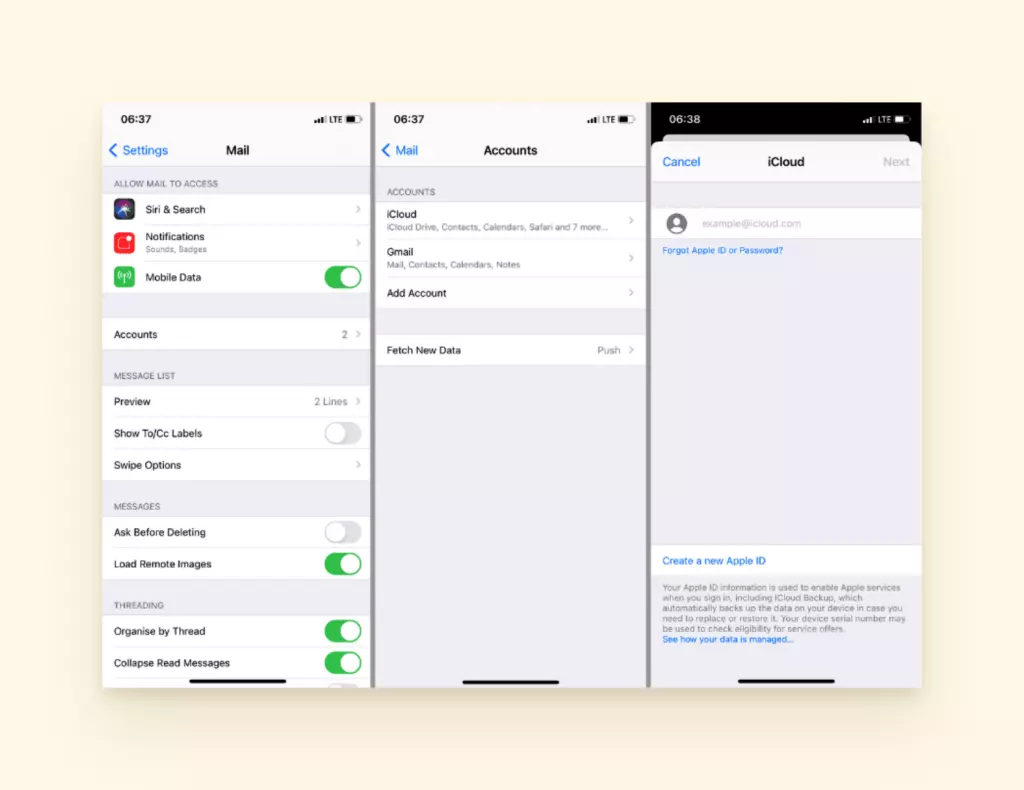
You can also create a new Apple ID at this point by tapping "Create a new Apple ID."
Step 6: Once your email account is verified, the iCloud screen opens. A pop-up message will ask if you want iCloud to use your phone's location.
You will also see a series of options that you can toggle on or off. Turning on automatically syncs selected options to your iCloud. This allows you to access that option on other devices connected to the iCloud such as your Mac or iPhone.
So, anytime you make any change to one of them on one device, the changes will also be applied to the other devices.
Step 7: Tap "Mail On".
That's it! Your iPhone is now connected to your iCloud mail.
Setting Up Yahoo!, Google Mail, Outlook.com, or AOL Accounts on your iPhone
Apple includes the incoming and outgoing server information for the most popular email providers such as Yahoo!, Gmail, Outlook.com, and AOL. Here are the steps to set up email on iPhone for the aforementioned email addresses:
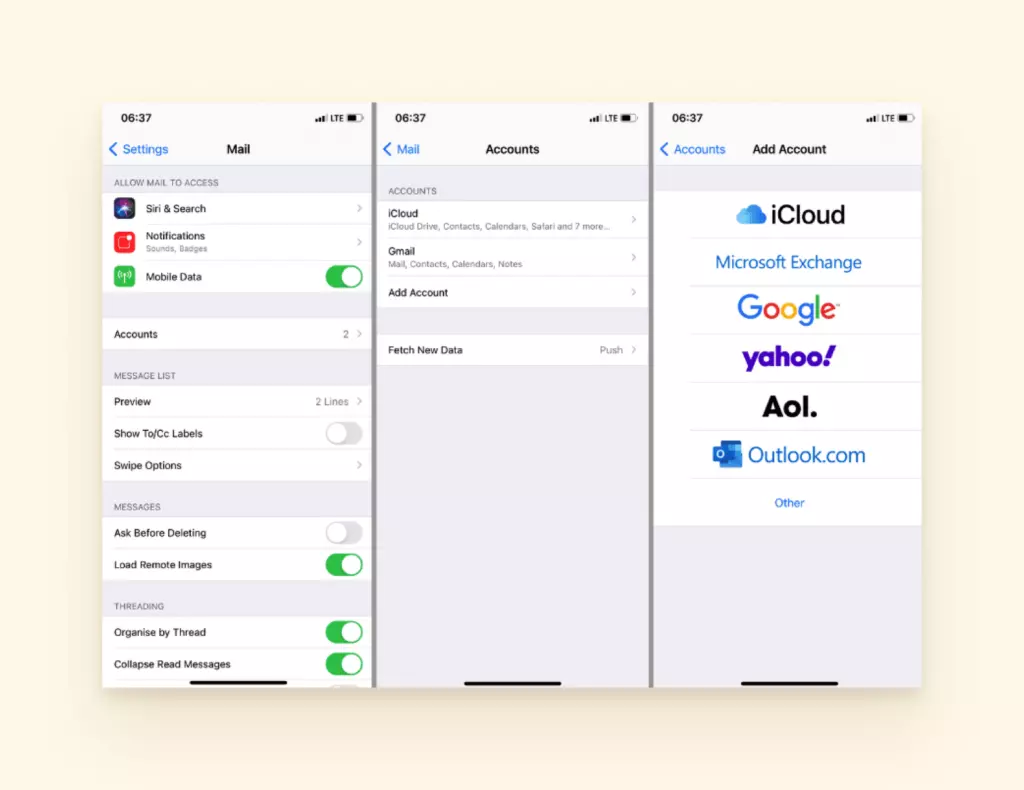
Step 1: On your Home Screen, tap "Settings."
Step 2: Navigate to "Mail."
Step 3: Tap "Accounts" and then the "Add Account" button.
Step 4: A list of email providers should appear. Select your email service provider.
Step 5: Sign into your account.
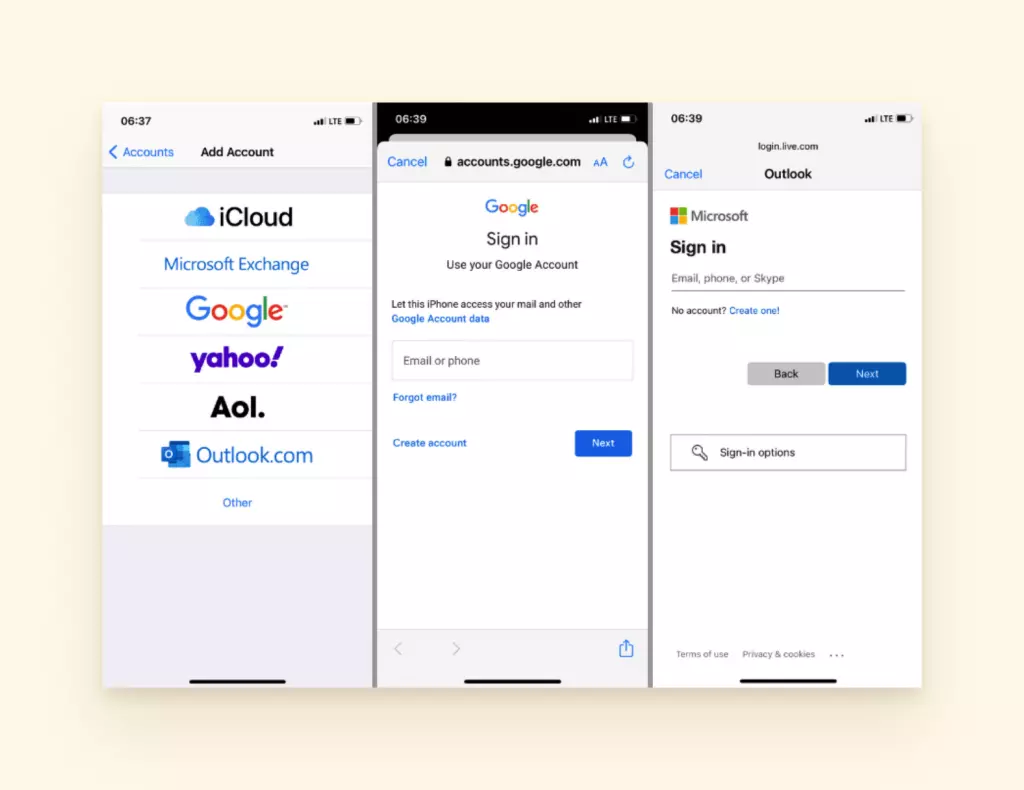
Note 1: For a professional Microsoft Exchange account, ask your company network admin for server details.
Note 2: POP or IMAP account, iPhone automatically recognizes whether the account is POP or IMAP based on the email address.
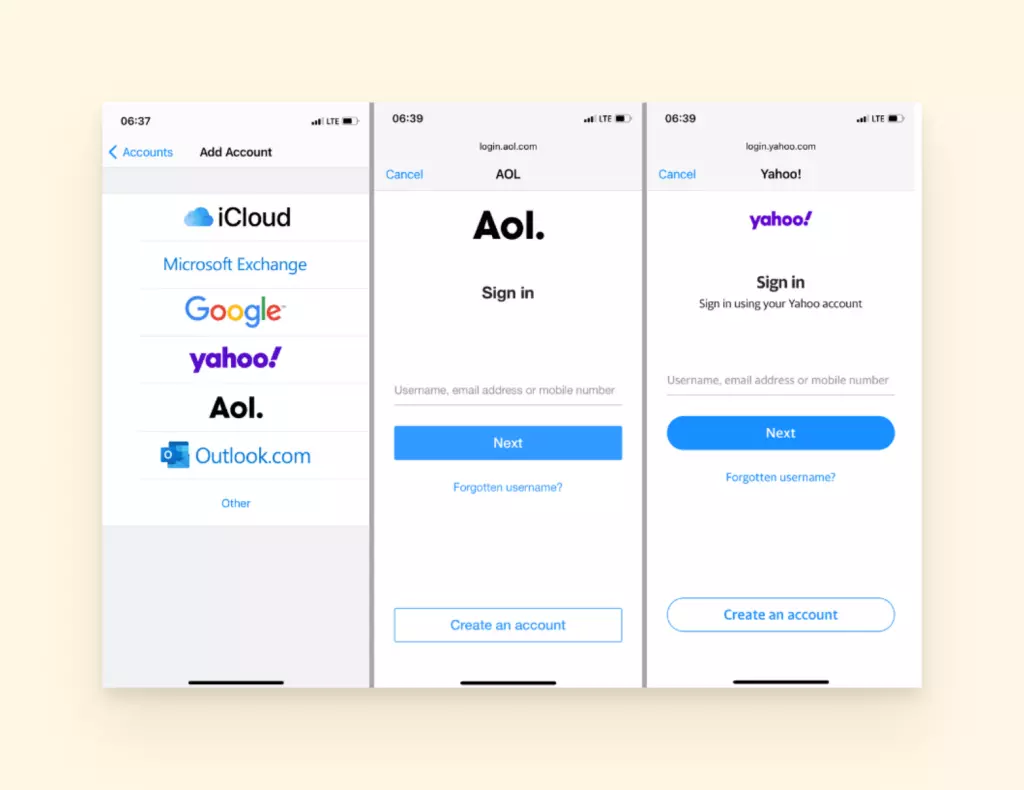
Step 5: If your provider is not on the list, tap "Other" and fill in the necessary information — Name, Email Address, Password, and Description.
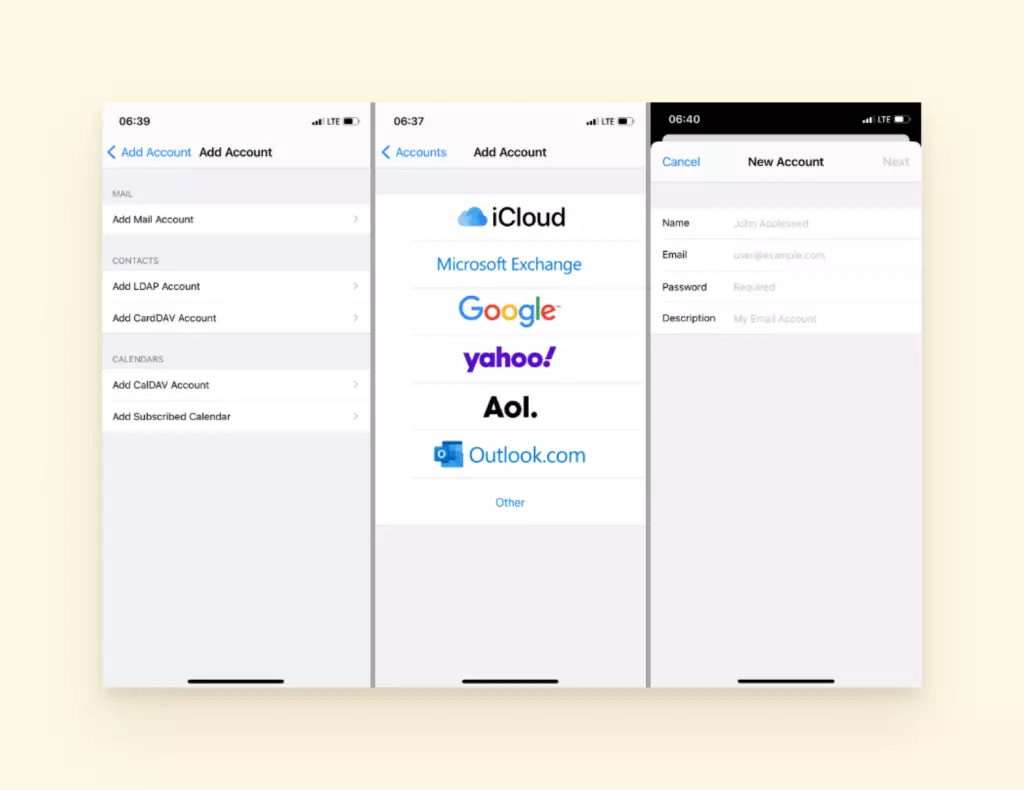
Step 6: Then, tap "Next".
Step 7: Wait for your account to be verified.
Note: For some email providers like Gmail, a few screens will open with several options that you turn on or off. After that, just tap "Save".
Conclusion
And that's how you set up an email account on your Android smartphone or iPhone! We hope you find this article useful in setting up your email account on your smartphone.
Was it easy to set up your email on Android or iPhone? Or did you experience some difficulties? Got any questions? Let us know in the comment section below!
Author Bio:
Hanson Cheng is the founder of Freedom to Ascend. He empowers online entrepreneurs and business owners to 10x their business and become financially independent. You can connect with him here.